1 2
weedburner
weedburner
2/2/11 4:01 p.m.

Here's a project i'm currently working on. Basically, I am building my own bellhousing to adapt a Ford Toploader 4spd transmission to my old school SB Chev V8. I can buy one for around $450, but it's a heavy 1/4" thick steel monster, and I prefer building my own lighter parts if i can. I'm not concerned about it not being "SFI certified", as it's just a fun street car and i have no desire to make it legal for the track.

The mock-up began with an old 400 block and an empty transmission case. I am using the alignment bar from my rearend narrowing jig to keep everything straight and true. I spent a couple nights machining some steel pucks to fit in the block's main bearing bores and also the bearing bores in the transmission case. The pucks have an 1.501" hole in the center so that my alignment bar will slide inside everything to keep the engine and transmission bores concentric. I made a ring to center the plate that the transmission will bolt to, and a tube spacer that will set the desired distance between the block and transmission face. I have also made the rear plate that the transmission will bolt to, and have laid out the the flange that will bolt to the block and serve as a pattern for the block plate that will fit behind the flywheel.

Working in my spare time after hours, I expect it will take me a week or two to get it done. The transmission is getting some special work as well, getting faceplated in 2nd, 3rd, and 4th. I'm adapting an aluminum tailhousing from an SROD overdrive trans to replace the Toploader's stock iron piece to shed some weight. Also machined down the Ford throwout collar so that I can use my existing Chevy hyd throwout bearing.

Here's the drawing I used to lay out the block's bolt pattern...

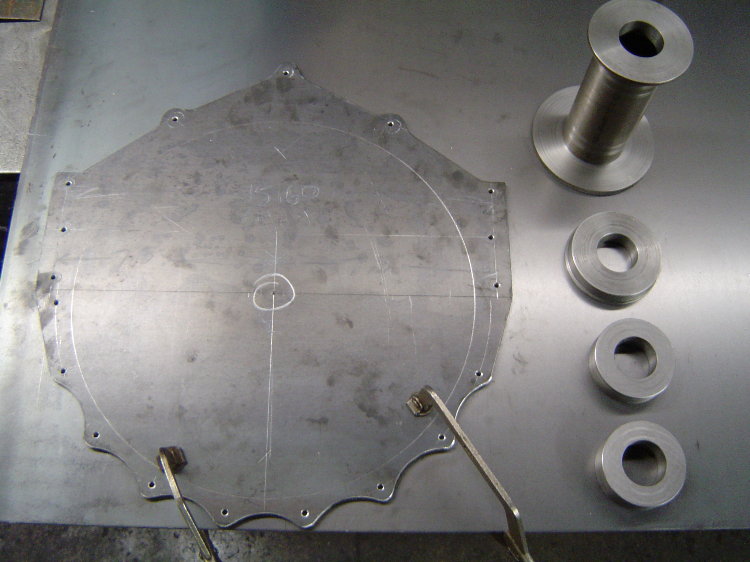
Here's the pattern I made out of 1/4" steel. All the hole locations were laid out, centerpunched, and drilled 3/16" so that the pattern could be transferred to the blank piece of 1/8" that it's laying on, which will be used to make the block protection plate. The steel pucks on the right are the pilot rings and spacer that i mentioned in an earlier post that locate everything in the correct positions for mock-up...

This is the block plate after it was cut out and drilled. The large hole in the center is for the crank's flywheel flange to stick thru, and the 2 larger holes on the sides are for the locating dowels in the block...

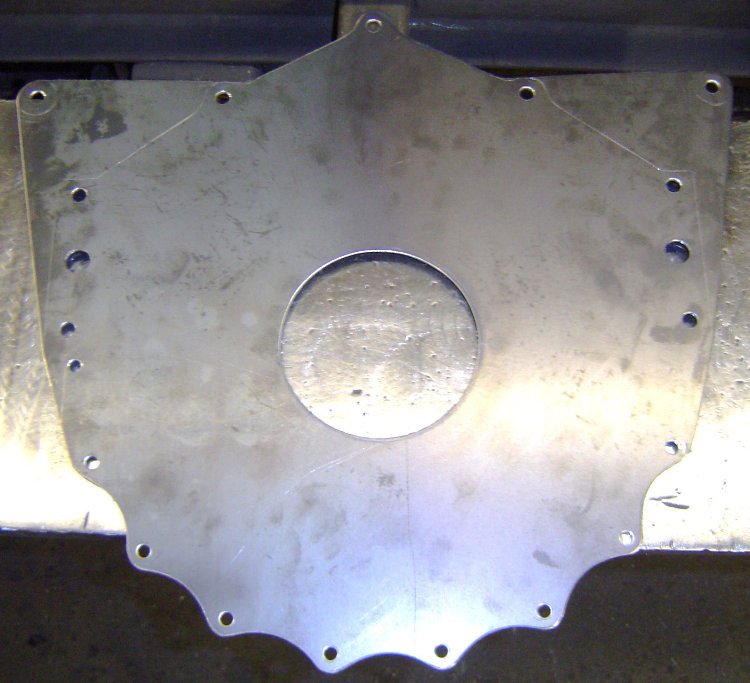
This is the pattern after i drilled it out and cut the center out. It is going to be the forward flange of the bellhousing that bolts to the block, the large hole in the center is necessary to clear the flywheel...

Here's the block plate on a block. The upper "wings" were added as mid-mounting points that will hang the back of the engine from the firewall...

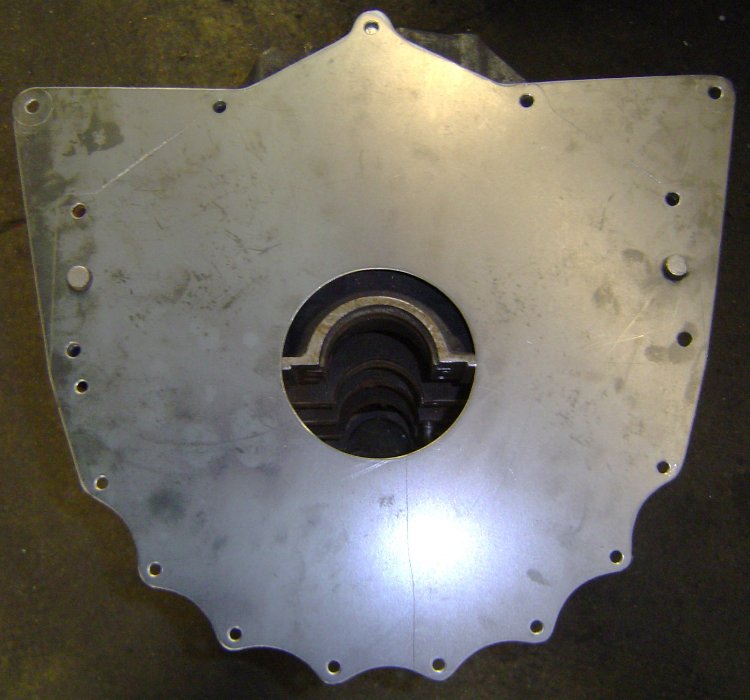
Here's the block plate and flange on a block. The block plate will be sandwiched between the block and bellhousing as shown. I'll soon be creating a hole and pocket for the starter.

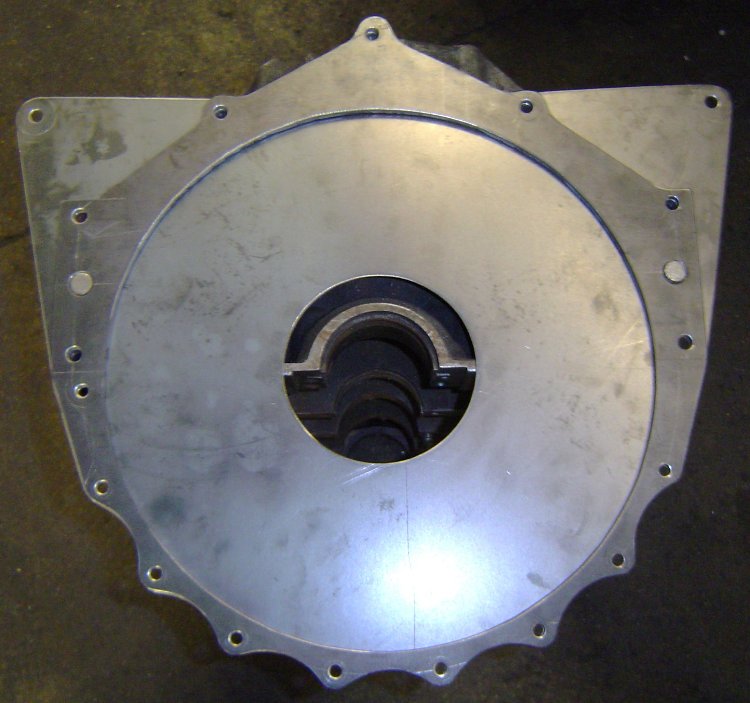
The mid-mounts incorporated into the block plate allow me to easily remove the bellhousing/clutch/flywheel from the car without needing to support the engine. Greatly simplifies clutch and transmission maintenance.

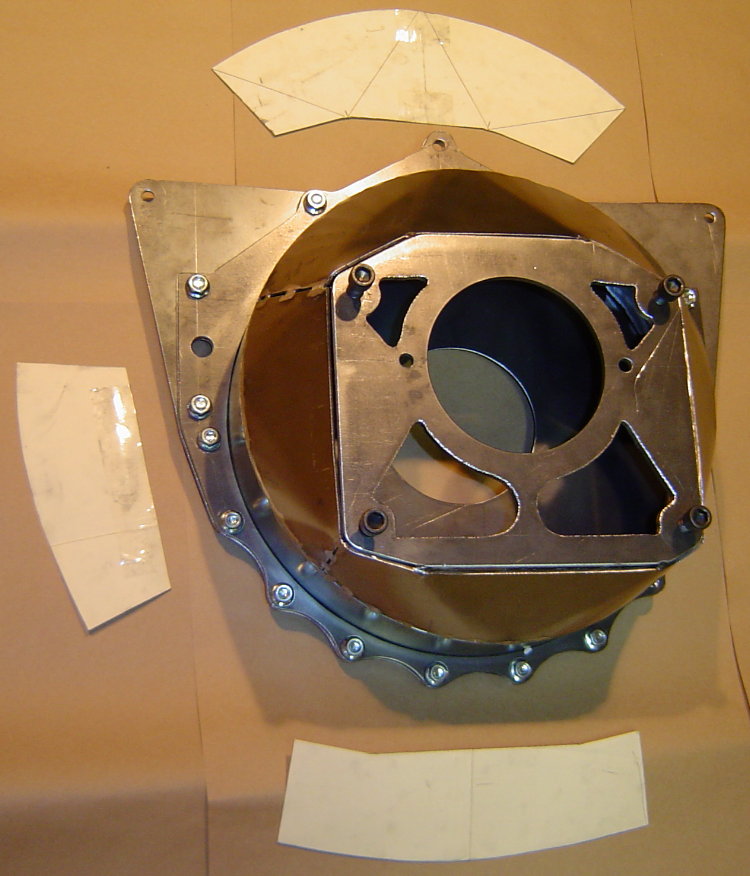
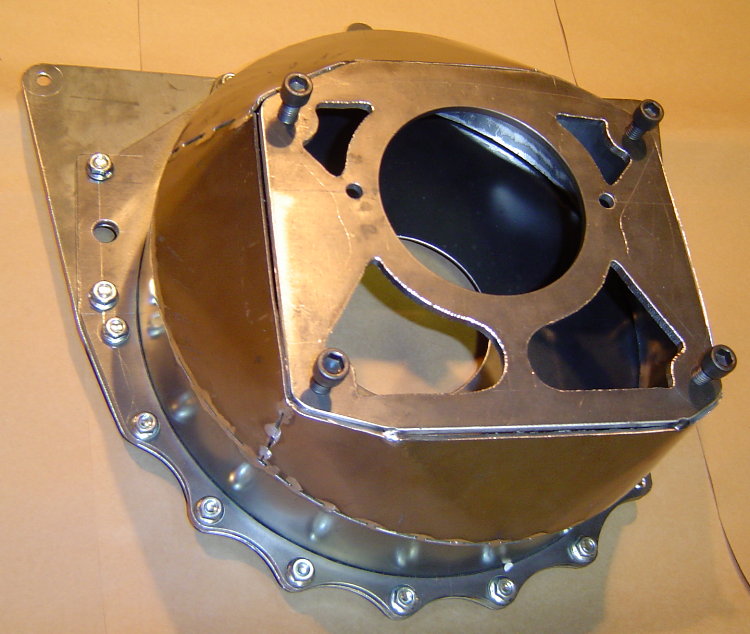
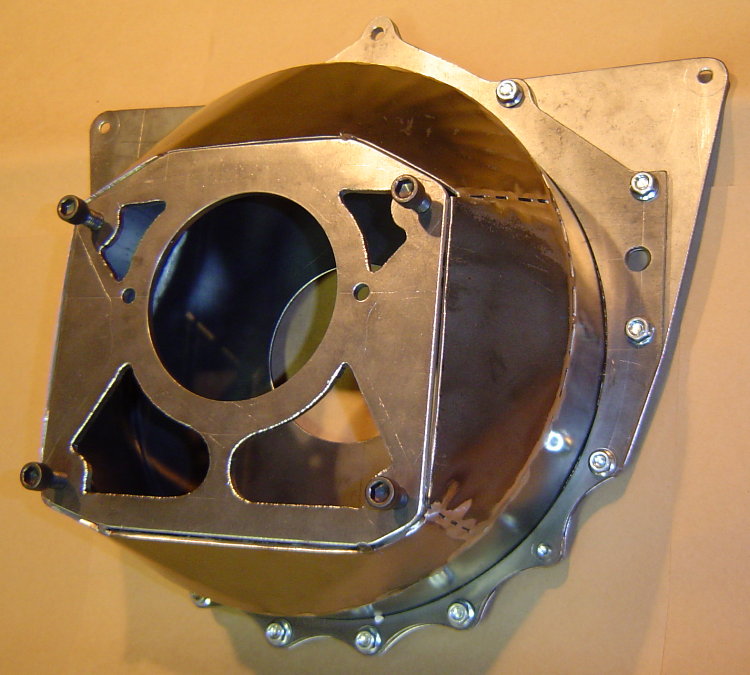
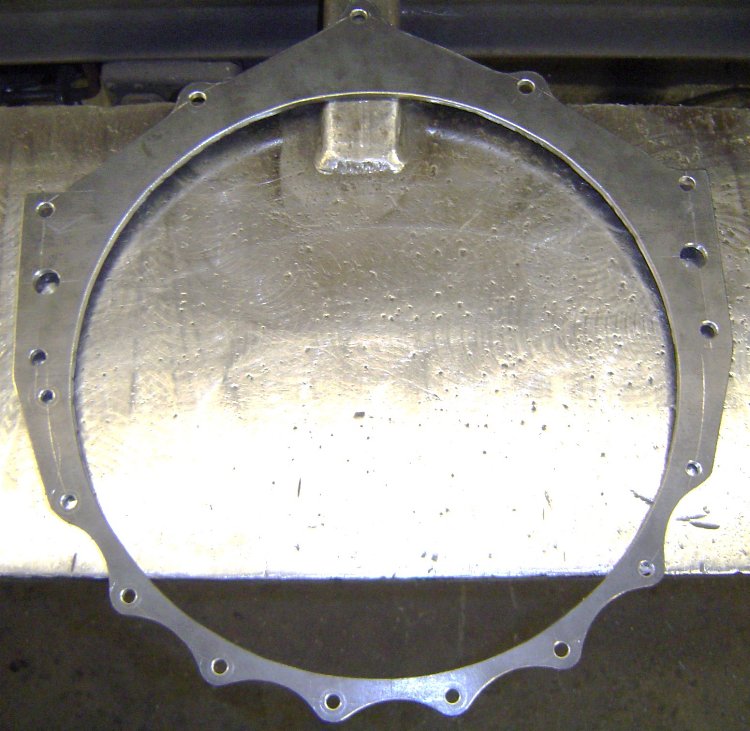
Here I welded the rolled ring to the bell flange, all the holes still line up...

When i made the parts, all the holes were drilled to the same size as the bolts that go thru them. My thinking was that it would keep everything as precision as possible during fab. After i'm done with all the welding, i'll drill them out one size over to allow easier/quicker assembly, maybe 2 sizes over if i decide to powdercoat it.

Here's the alignment bar in place in the block, as well as the spacer that sets the depth between the block and trans case...

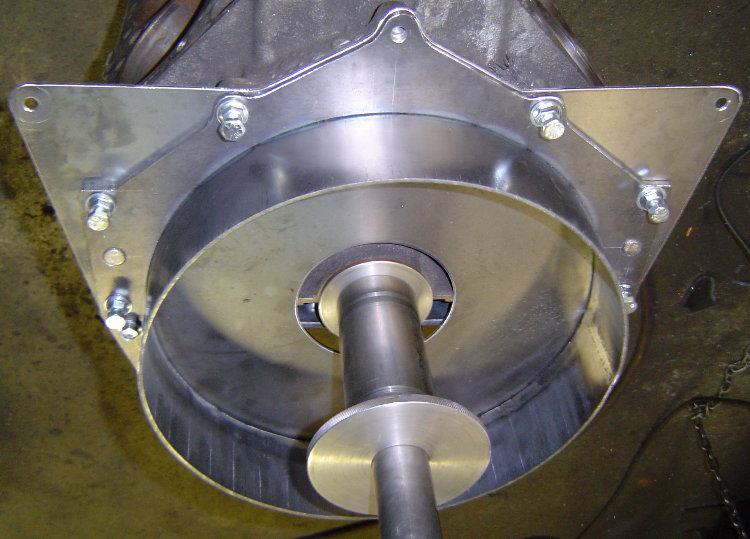
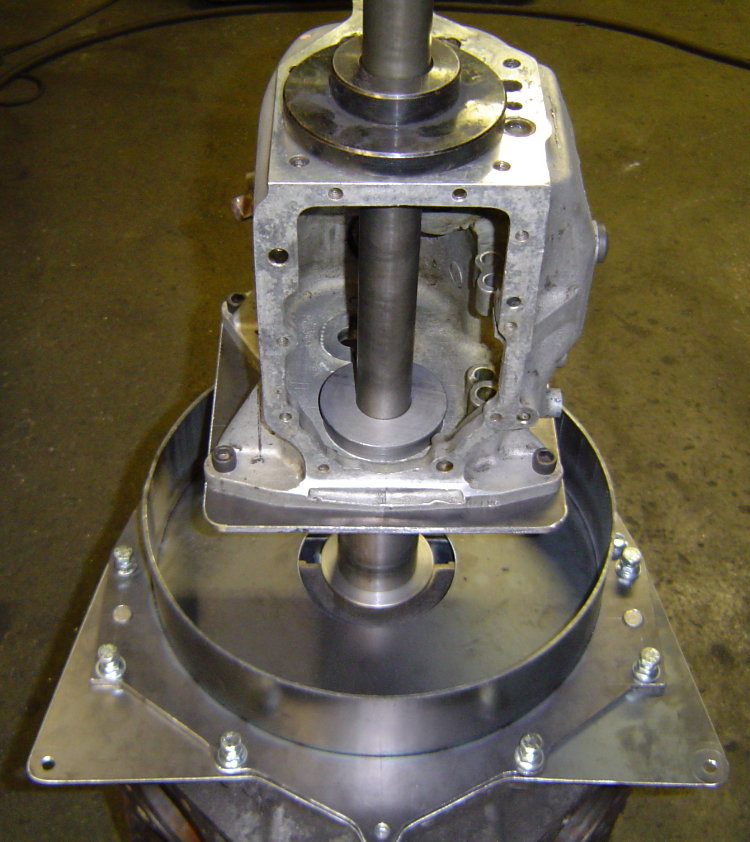
Here's the trans case in position located by the pilot rings...

I'll post updates over the next week or so...

DILYSI Dave
DILYSI Dave SuperDork
2/2/11 4:44 p.m.

VERY cool.

NOHOME
NOHOME Reader
2/2/11 5:03 p.m.

That shows some skill that beyond many of us here. Way cool. I am guessing you work in a machine shop environment?

fast_eddie_72
fast_eddie_72 HalfDork
2/2/11 5:10 p.m.

Man, that's awesome! When guys like you post things like this I always want to ask a lot of questions. But I'll just ask one.

"Here's the pattern I made out of 1/4" steel."

So, what did you cut that with?

imirk
imirk New Reader
2/2/11 5:23 p.m.
fast_eddie_72 wrote: So, what did you cut that with?

His Johnson, Must have to do a project this cool.

TuffWork
TuffWork Reader
2/2/11 5:30 p.m.

I wish I could do that. You are nuts. I woulda just spent the 450.

4cylndrfury
4cylndrfury SuperDork
2/2/11 5:51 p.m.

I would like to subscribe to your newsletter.

weedburner
weedburner New Reader
2/2/11 6:10 p.m.

Believe me, my shop is nothing special. It was cut by hand with a little Hypertherm 350 (1/4" max cap) plasma. I used a magnetic toolholder (like you use on a workbench wall to hold screwdrivers and pliers) as a straightedge for the straight cuts, and held a large washer in place as a guide to cut the scallops. The large center hole was just hand cut by eye along the scribed line.

ValuePack
ValuePack Dork
2/2/11 6:33 p.m.

I make Hypertherm plasma nozzles for a living(swiss machinist), nice to see my products at work for a change.

Brilliant project you've got there, can't wait to see more!

2002maniac
2002maniac HalfDork
2/3/11 2:08 a.m.

you've got a very steady hand. Great work!

novaderrik
novaderrik HalfDork
2/3/11 3:50 a.m.

what year is the 350 you will be using?

if it's a pre-86 block, then you might need to make the center hole on the block plate bigger to clear the counter weight on the crank.

also, the 2 big dowel pins are what locates the bellhousing- making the bolt holes bigger won't affect the alignment at all. but it is suggested to properly align your bellhousing with the particular block you are actually going to be running- you can get offset dowel pins to get the alignment absolutely perfect for silky smooth shifting..

Armitage
Armitage Reader
2/3/11 10:01 a.m.

Images aren't working :(

tuna55
tuna55 Dork
2/3/11 11:10 a.m.

Very cool, a lot of good work... but...

What's wrong with a Muncie? just curious.

fast_eddie_72
fast_eddie_72 HalfDork
2/3/11 11:14 a.m.
weedburner wrote: Believe me, my shop is nothing special. It was cut by hand with a little Hypertherm 350 (1/4" max cap) plasma. I used a magnetic toolholder (like you use on a workbench wall to hold screwdrivers and pliers) as a straightedge for the straight cuts, and held a large washer in place as a guide to cut the scallops. The large center hole was just hand cut by eye along the scribed line.

Fantastic. I have access to a plasma cutter but haven't learned how to use it yet. Need to get in there and take a look. Shoot, still need to learn how to weld too : (

weedburner
weedburner New Reader
2/3/11 11:20 a.m.
novaderrik wrote: what year is the 350 you will be using? if it's a pre-86 block, then you might need to make the center hole on the block plate bigger to clear the counter weight on the crank. also, the 2 big dowel pins are what locates the bellhousing- making the bolt holes bigger won't affect the alignment at all. but it is suggested to properly align your bellhousing with the particular block you are actually going to be running- you can get offset dowel pins to get the alignment absolutely perfect for silky smooth shifting..

After everything else is finish welded, the tacks on the trans mounting plate get cut and it's location adjusted before welding it in place. I should be able to get it pretty close w/o using offset dowels. I'll use them if i need to, but shifting is not much of a problem when you have dog rings

weedburner
weedburner New Reader
2/3/11 11:47 a.m.
tuna55 wrote: Very cool, a lot of good work... but... What's wrong with a Muncie? just curious.

For me, it's 1st gear ratio. 2.78 for a WR Toploader vs 2.52 or 2.56 for the M20 Muncie, 2.20 for the M22. My car currently has more of a straight-line theme.

The Toploader is pretty close to the top of the food chain for an OEM 4spd, and i just happen to have a few laying around. I don't want the extra weight/drag of a T56, and this car has already broken way more than it's fair share of T5s. The car is light but if it starts breaking the TL, my next step will be a Jerico.

weedburner
weedburner Reader
2/3/11 11:54 a.m.
ValuePack wrote: I make Hypertherm plasma nozzles for a living(swiss machinist), nice to see my products at work for a change. *Brilliant* project you've got there, can't wait to see more!

Thanks. I'll do my share to keep you busy, i go thru 2-3 sets of nozzles/electrodes a week. Most of what i cut is 14ga sheet, but i always slip in a fresh set of consumables for stuff like this.

tuna55
tuna55 Dork
2/3/11 1:08 p.m.
weedburner wrote:
tuna55 wrote: Very cool, a lot of good work... but... What's wrong with a Muncie? just curious.
For me, it's 1st gear ratio. 2.78 for a WR Toploader vs 2.52 or 2.56 for the M20 Muncie, 2.20 for the M22. My car currently has more of a straight-line theme. The Toploader is pretty close to the top of the food chain for an OEM 4spd, and i just happen to have a few laying around. I don't want the extra weight/drag of a T56, and this car has already broken way more than it's fair share of T5s. The car is light but if it starts breaking the TL, my next step will be a Jerico.

I concur with your points, it just seemed like a lot of work. The "I had it lying around" is a very strong driving force, though. I respect the toploader, don't get me wrong, it just seemed close enough from this side of the keyboard.

I hope you get those pictures up soon. I always wanted to tackle something like this.

minimac
minimac SuperDork
2/3/11 1:10 p.m.

i can't see anything, but it sounds like I'm missing coolness.

weedburner
weedburner New Reader
2/3/11 1:43 p.m.

In reply to minimac:

I think my server is having trouble. Sometimes i see them, sometimes i don't... You can usually see them here

weedburner
weedburner Reader
2/8/11 11:39 a.m.

Here's another update... I had to take it out of the fixture to make sure i had created enough room to install a SoftLoc clutch, so i figured i'd snap a few pics of the progress.

I started making patterns for closing in the bell by laying out the the top section on posterboard. I quickly realized it was much easier to just cut out slightly larger pieces of posterboard, hold them in place on the bell, and simply apply a little pressure by running my finger around the edges of the steel. This puts a small crease in the posterboard and transfers the exact shape needed, a much quicker way to create a pattern...

The transmission plate is still only tacked in 4 places. After all the rest of the welding is done, i'll put the bell back into the fixture, cut the tacks, and re-position the plate for the best alignment possible before welding it in place. I doubt there will be any need to machine the block or transmission mating surfaces.

Still need to make a pocket for the mini-starter that's going on the car...

To be continued...

4cylndrfury
4cylndrfury SuperDork
2/8/11 12:14 p.m.

ultra impressive...

dculberson
dculberson Reader
2/8/11 12:18 p.m.

Too cool!! Lots of good ideas in here.

Curmudgeon
Curmudgeon SuperDork
2/8/11 6:47 p.m.

Nice work!

There was a guy who used to post on RX7Club who had some freaky little mid engined French car, can't recall the name just now. Anyway, this guy made a bellhousing adapter to bolt a Toyota transaxle to the back of a 12A and then stuck all that in the back of his car. I thought that was the height of 'home brewed' transmission to engine engineering till I saw this.

eastpark
eastpark Reader
2/8/11 8:23 p.m.

Very cool! I was just looking at your RX-7 link from Bang Shift: http://www.bangshift.com/blog/BangShift-Project-Spotlight-An-Awesome-Home-Built-V8-RX7-That-Hauls-Ass.html

1 2

You'll need to log in to post.

Our Preferred Partners
IwawMbluCh50ejCRqTIfEuURf0KknXygdlbNvlCDfZK8Dk7ohygIvoLQbkStGhbc